QUICK VIEW
My Toolbox:
- Visual Studio Code (free)
- Python with Virtual Environments (free)
- Git (free)
If you’re a cool guy:
- Docker & Docker-Compose (free)
- Linux vServer ($)
- A Domain with enough subdomains ($)
As I said. I’m not an IT professional. I’d not be sitting here writing blogs if I was probably. Anyway, as my lines of code start adding up and some of them actually didn’t turn out so bad, here’s my best-practice toolbox that should get you going faster (even if you’re not an IT professional too)
For me this setup works for programming Python, web apps based on Python and developing own WordPress plugins.
Visual Studio Code with Extensions
I have worked with some IDEs but as of 2022, Visual Studio Code seems to me as good as it gets. It features pretty useful extensions that make your life easier (e.g. one that autocompletes WordPress functions that nobody can remember).
More importantly it also features remote development that is particularly useful for WordPress development of plugins or for anything that is supposed to run outside of your shitty laptop.
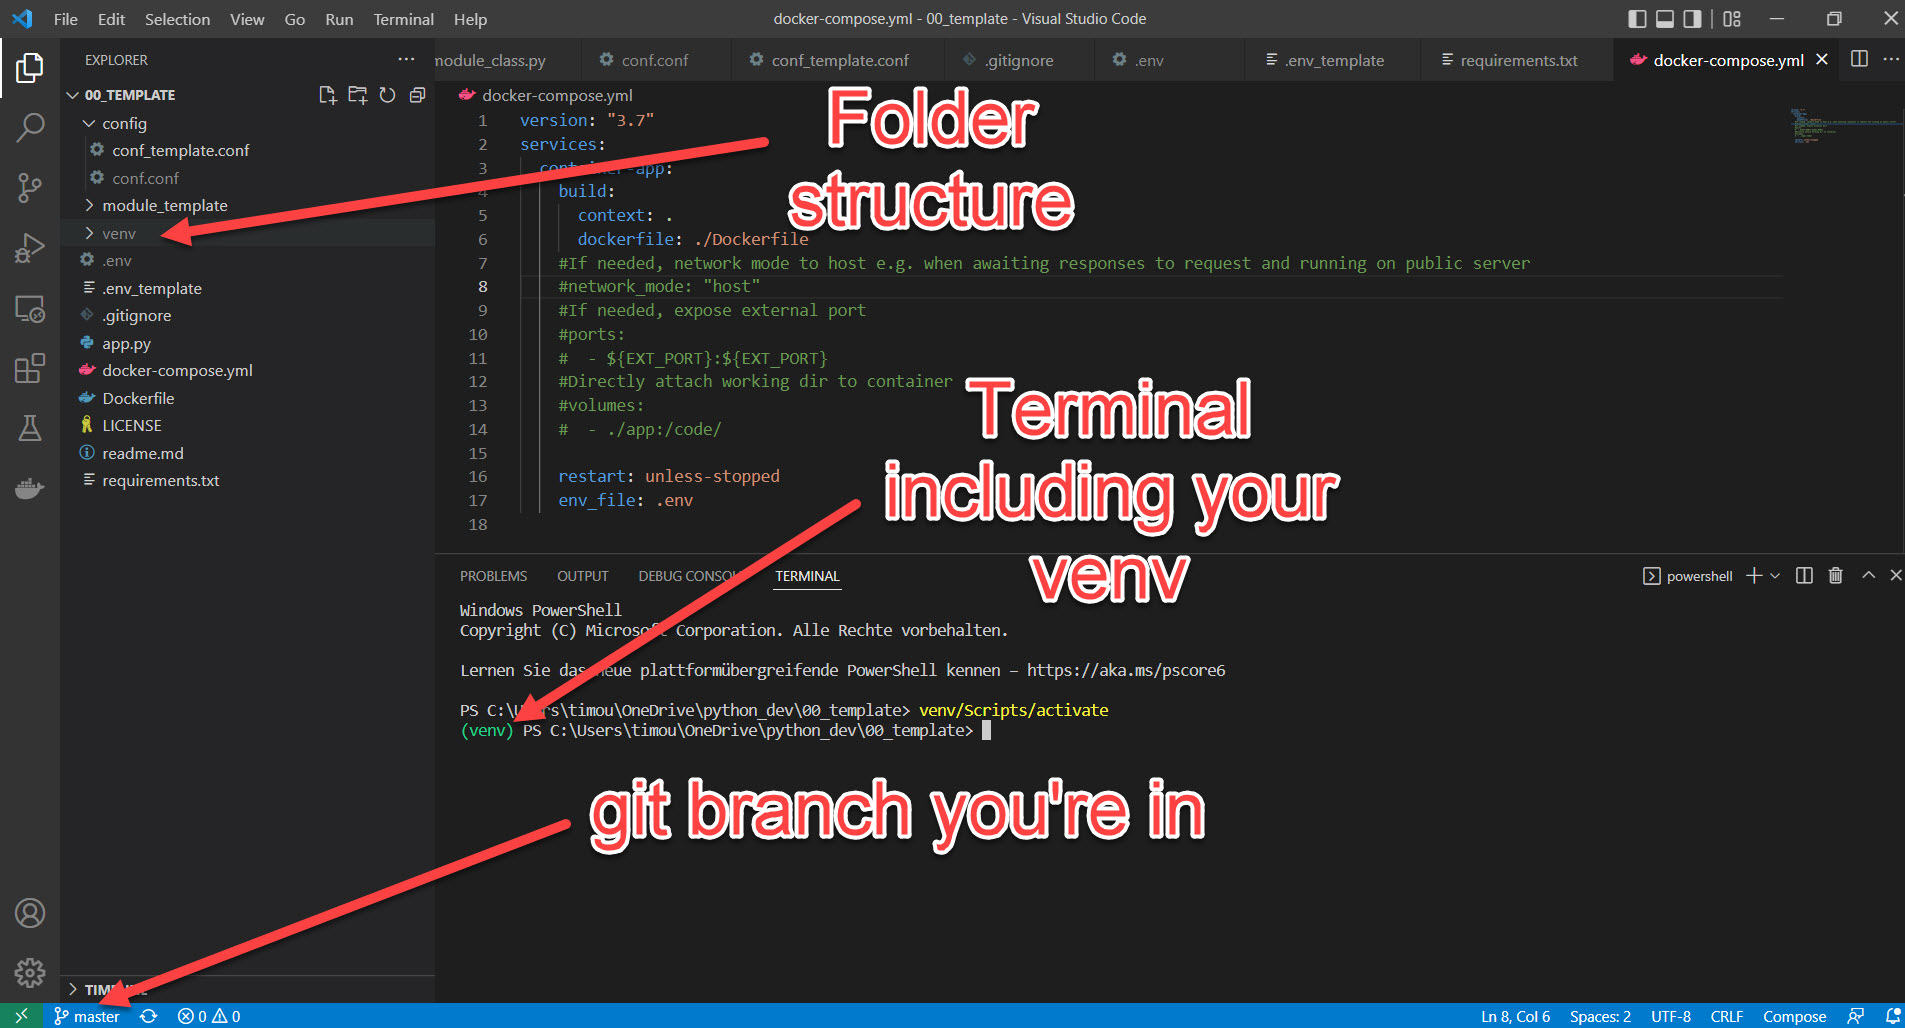
Visual Studio Code also has a nice way of handling files, folder structure, your source code management and actual code on one screen which speeds up the process.
Check out my detailed blog on why you should be using Visual Study Code.
My VS Code Extensions
- Python
- Docker
- Git
Python with Virtual Environments
It’s easy to fuck up your local Python setup and start messing around with dependencies, Python versions and and and …
Let’s try and get you on a better route. First of all let’s install Python. Wait a minute … what Python version? There’s Python 2, 3 (and probably soon 4). You decide. Most probably you will be fine with any of the newer Python versions. You can also have multiple Python installations on yourcomputer in parallel.
Then it is important to understand the concept of adding the right Python version to your PATH variable.
During the installation you will be asked if you want to add Python to your PATH. Say you’re installing Python 3.10 and add it to your PATH as “python”. Everytime you now type “python” into your console or terminal, this Python installation will be called by default. If you now add another Python version (maybe 2.7 because you’re a hipster) you should watch out not to mess with your PATH variables. In that case it could make sense to add one ad python3 and one as python2 just that you always know what version your are using.
Anyway …
Before you program shit, you should get familiar with Virtual Environments. Virtual Environments allow you to bundle all your dependencies (say a package that enables you to read QR-Codes and depends on a certain version of OpenCV … ) in one place and have it as reproduceable as possible.
Before you start any new project create a new folder for it. If you’re smart try and come up with some naming conventions (e.g. analytics_fancy code name, … or automation_fancy code name). Open this exact folder in Visual Studio Code and create a Virtual Environment from the terminal.
python -m venv venv
That should create a folder within your directory named venv. This venv (Virtual Environment) contains its very own Python executable and solely relies on the packages you will install into this Virtual Environment.
Before you install anything, you need to activate the Virtual Environment.
On Windows
venv/Scripts/activate
On Linux
source venv/bin/activate
Next, you will create a file called requirements.txt in the folder you’re programming in. This file will hold all of the external packages that your own code relies on (e.g. pandas, requests, selenium) and if you’re good also their specific version.
Everytime you now install and import something new, you will type it in the requirements.txt
You can now easily install everything that is needed for your code in one elegant line
pip install -r requirements.txt
This way, the next time you spill your beer over your keyboard and need to buy a new laptop, at least you don’t have to worry about your dependencies. (It also eases the way of deploying your app on any cloud computer but are we really that far?).
Now we’re having VS Code installed and Python running in nice and clean Virtual Environments. You now may create your first app.py or main.py (or whatever.py) and hammer in your print(“Hello World!”) example.
Learn some Source Code Management with git and GitHub
Honestly, it’s not that hard. And it can save your ass. Source Code Management is extremely crucial for larger projects where multiple (actual) programmers work together on code. It allows to review code before going live, people working on multiple branches at the same time and others reverting some really bad commits that a drunkard made last weekend. Everything without fear of losing track of what was working and what not.
For you, git and GitHub will just be a safe place to store your versioned code. You can always turn back changes you made to a specific date or commit and even encourages you to try out more and take some higher risks when developing (because you can always turn back, right?)
Start by creating an account on GitHub and download git on your computer.
Then go ahead and in your working directory of your frist Python app execute following code:
git init
Boom, that created a .git folder in your folder which is your repositoriy (repo) and will from now on track all the weird changed you commit (ah by the way, DO NOT HARDCODE ANY PASSWORDS into your code and commit them – just a friendly hint 🙂 ).
Because we’re also holding a venv folder, we should also create a .gitignore file which tells git to ignore certain folders. The file content can look as simple as this:
venv/
The venv folder could contain thousands of single files depending on the packages you install. So you do not want to have them in your private repo.
					git status
git add .
git commit -m "this is my first commit"
git remote add origin ssh://your-git-repo-address
If you’re registered on GitHub now, you can also add your remote repository. First, I’d recommend you to setup an SSH-Key pair with your private computer and your GitHub account. Here are the docs on how to do that:
https://docs.github.com/en/authentication/connecting-to-github-with-ssh
This will dramatically ease your life and make your connection even safer. Set up single SSH-Key pairs for every machine you plan to work from.
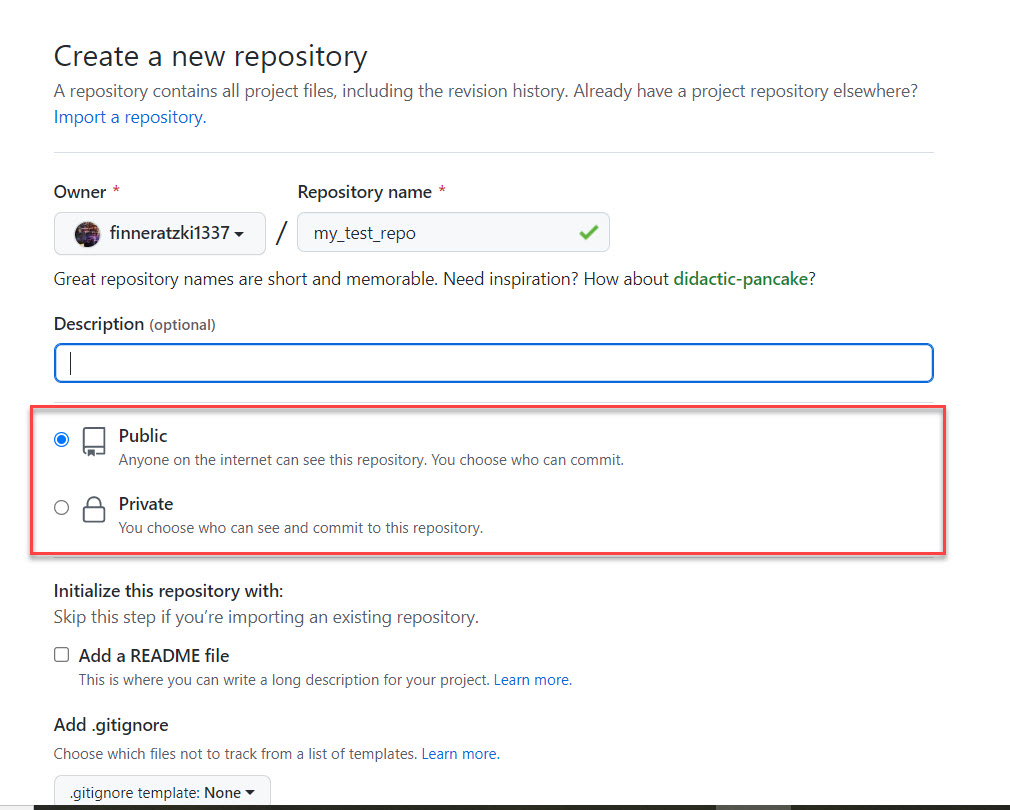
If ready, go to GitHub, create you first online repo and copy paste the SSH address from your new repos page. Pay attention to the Public/Private setting. Also you don’t need GitHub to add any files.
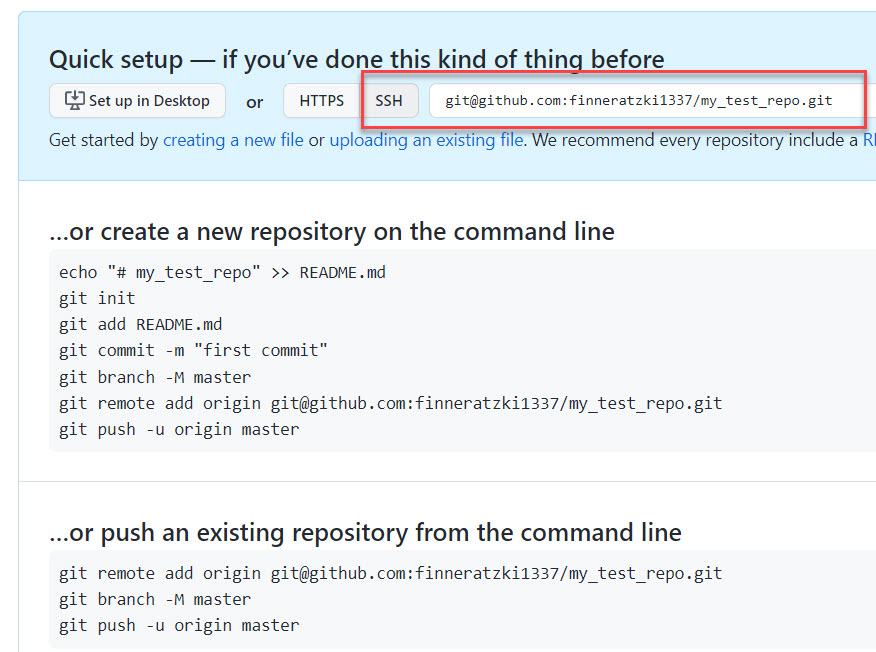
Then go to your local repo and add the remote one as “origin”. Pushing you repo into “origin” will sync your local developments with the cloud repo at GitHub.
					git remote add origin ssh://your-git-repo-address
git push origin master
Et voilá, now you have a local and online repo that you can sync as you like. If you plan to further develop your repo you would normally start with cloning your online repo into a new folder on your computer, setup the venv with your requirements.txt, improve the code and then git push origin master your changes back to GitHub.
From here you're good to go. Read further if your want to get into remote development and more advanced stuff.
Docker and Docker-Compose
Docker enables you to run your code in pretty little controlled containers. This kind of container would run on a Windows machine and on Linux, enabling you to program your code locally and later deploy it on any kind of cloud server (read my article on FastAPI cloud app architecture for non-pro’s).
Basically all you need to do is download and install Docker on your computer. If you’re running on Windows, the process is as easy as downloading the Docker desktop app and install it. For the others, here’s a link to the installation instructions: https://docs.docker.com/get-docker/
Here’s an article where I explain the concept of Docker containers more in detail [LINK]. For this tutorial I just want you to know that I’ve made best experience with using the full stack, meaning Docker and Docker-Compose always at once.
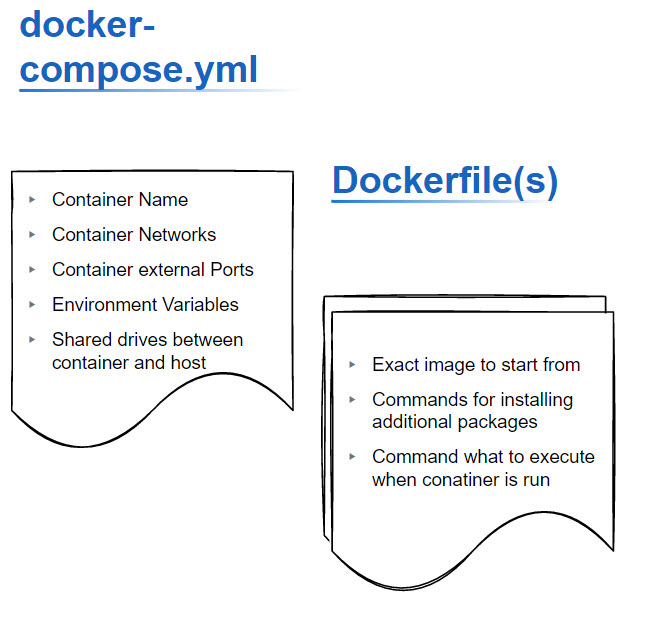
The docker-compose.yml file tells Docker everything abouth the environment and “external” behavior of a container, the Dockerfile itself (which is run when the container is built) tells Docker everything about how the container is made up exactly and what code it’s supposed to execute.
Check out the docker-compose.yml and Dockerfule in my template repo (and by the way, use my templates anyway): https://github.com/finneratzki1337/python-docker-template
vServer with SSH connection for remote development and online apps
Look at this amazing video by Corey Schaefer on how to setup a vServer with an SSH connection.
This will later enable you to directly program on that vServer with Visual Studio Code. I even make live changes on my development websites using this technique. It’s a great way to learn dealing with Linux and allows you actually maximum freedom in the way you deploy your applications.
Paired with Docker, a 24/7 Linux server allows you to run online apps at a really small budget.
Depending on the service provider the costs are still manageable. Even if you don’t have immediate plans to utilize an online always-on service, think of it as something you can really learn from.
There are a lot of platforms that offer you these kind of services like Linode, Digital Ocean, Hetzner, Azure, AWS EC2. With AWS you can probably even get started for free (with very limited computing and memory capacity).
I would recommend following software to be installed:
- Apache2
- Python (3)
- Docker and Docker-Compose
- At least one database (yes, you can run your own always on database, how cool ist that?)
Now that you’re operating your own vServer you should try remote development with VS Code. This requires you to succesfully have setup an SSH connection to your vServer as shown in the video linked above.
Once done, you can develop and execute code on the vServer as if it was on your machine using the terminal in VSCode. Especially nice for some repetetive things, cronjobs, and stuff that just takes long and stops you from watching your adult movies or whatever.
Your own domain (yup thats right you should have one)
Once you’ve decided to run your own vServer, it would be nice to reach it easy and make your apps accessible, right?
I bet you can find a domain for a cheap as $1 per year. Buy it, and have the A-Record of the DNS entries of this domain point to your vServer. In a later tutorial [LINK] I will write more in detail how you can connect certain subdomains using a reverse proxy to single Docker Containers that run an API you’ve programmed.
That way you can actually pretty easily connect any service to e.g. api.your-funny-domain.com and have it receiving your new database entries or reply to your requests.