QUICK VIEW
Starlight Model In Short
- A star has a core, radiation zone, convection zone and Corona
- Your Golden Dataset is in the core, the production system
- The radiation zone transports data towards your reporting layer, the convection zone
- In the convection zone, data can still be enhanced, modified, commented and put back to your reporting layer
- Once your data reached the corona, the end-user API, it will never return like a light beam. Then it can be broken up but any enrichment will not be available to other people looking at the star

As you might know, I’m not the biggest fan of Excel and Macros. The simple reason for that is, that I believe there are so much more stable and smart ways to produce the same result as before. Of course there are exceptions for that and VBA still exists for a reason.
In this article I want to give you an overview of when I still think it is OK to use a VBA and whatsome sample use cases are for both Excel and Python.
Use Python rather than Excel if ...
You should be using Python (or another clean and easy programming language) if
You have multiple inputs to your process
Say you try to create a nice little analysis on missing datasets in your logistics department. You most probably need to have more than one input datasets. E.g. you would need a dataset describing the currently open orders (which are supposed to be transported). Then you need another internal report from your warehouse on the currently processed orders. Lastly you need a dataset from your transportation service provider indicating deliveries.
You might want to know for which open orders you do not yet have any warehousing or transportation info. Maybe you even want to know for which orders you have transportation data but no warehousing data (lack of data quality in your warehouse).
One source file would be a raw .csv file exported from your order system. One is a spreadsheet prepared by your warehouse (well you wouldn’t want someone to manually prepare spreadsheets but they do, so here we go …) and the last one is data sitting in a database connected to your transportation partner.
Input formats might change (you never know) and you really need to be sure to make correct joins and calculations at all times.
Here you need to use Python. Python offers a variety of free libraries that allow you to easily connect to various data sources such as SQL databases or simple .csv files and obviously Excel files as well. As you find your input data changing from time to time and your process braking, it is probably a good idea to implement some automated testing and source code management like git to keep track if your code is working and of all the changes that became necessary.
Your data processing is rather complicated
Lorem ipsum dolor sit amet, consectetur adipiscing elit. Ut elit tellus, luctus nec ullamcorper mattis, pulvinar dapibus leo.
Use-cases for Excel rather than Python
For this Setup Visual Studio Code is perfect as it allows you to work remotely on a server using SSH. Here’s a link to my more detailed Blog on how and why you should be using Visual Studio Code.
You should definitely consider installing the WordPress Code Snippets Extension that allows you to autocomplete almost every WordPress function that otherwise is a pain to look up every time.
My VS Code Extensions for WordPress Plugin Development
- WordPress Code Snippets (for WordPress functions)
- PHP DocBlocker (helps you generate good DocStrings for documentation
- PHP Intelliphense (Autocomplete for PHP functions)
- Sonarlint (for Code Quality Check)
- Remote – SSH (for remote development on your vServer)
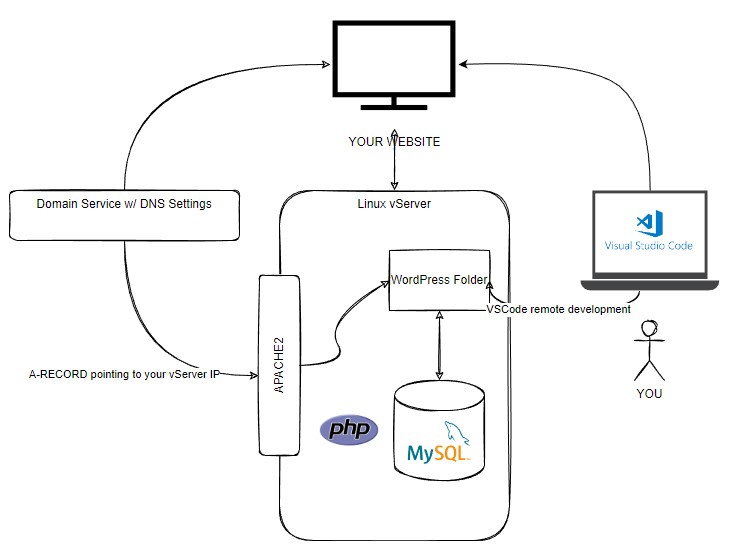
vServer with SSH connection for remote development and online apps
Look at this amazing video by Corey Schaefer on how to setup a vServer with an SSH connection.
This will later enable you to directly program on that vServer with Visual Studio Code. I even make live changes on my development websites using this technique. It’s a great way to learn dealing with Linux and allows you actually maximum freedom in the way you deploy your applications.
Paired with Docker, a 24/7 Linux server allows you to run online apps at a really small budget.
Depending on the service provider the costs are still manageable. Even if you don’t have immediate plans to utilize an online always-on service, think of it as something you can really learn from.
There are a lot of platforms that offer you these kind of services like Linode, Digital Ocean, Hetzner, Azure, AWS EC2. With AWS you can probably even get started for free (with very limited computing and memory capacity).
I would recommend following software to be installed:
- Apache2
- mySQL Server
- UFW (Uncomplicated Firewall)
- PHP
Now that you’re operating your own vServer you should try remote development with VS Code. This requires you to succesfully have setup an SSH connection to your vServer as shown in the video linked above.
Once done, you can develop and execute code on the vServer as if it was on your machine using the terminal in VSCode. Especially nice for some repetetive things, cronjobs, and stuff that just takes long and stops you from watching your adult movies or whatever.
Learn some Source Code Management with git and GitHub
Honestly, it’s not that hard. And it can save your ass. Source Code Management is extremely crucial for larger projects where multiple (actual) programmers work together on code. It allows to review code before going live, people working on multiple branches at the same time and others reverting some really bad commits that a drunkard made last weekend. Everything without fear of losing track of what was working and what not.
For you, git and GitHub will just be a safe place to store your versioned code. You can always turn back changes you made to a specific date or commit and even encourages you to try out more and take some higher risks when developing (because you can always turn back, right?)
Start by creating an account on GitHub and download git on your computer.
Then go ahead and in your working directory of your frist Python app execute following code:
git init
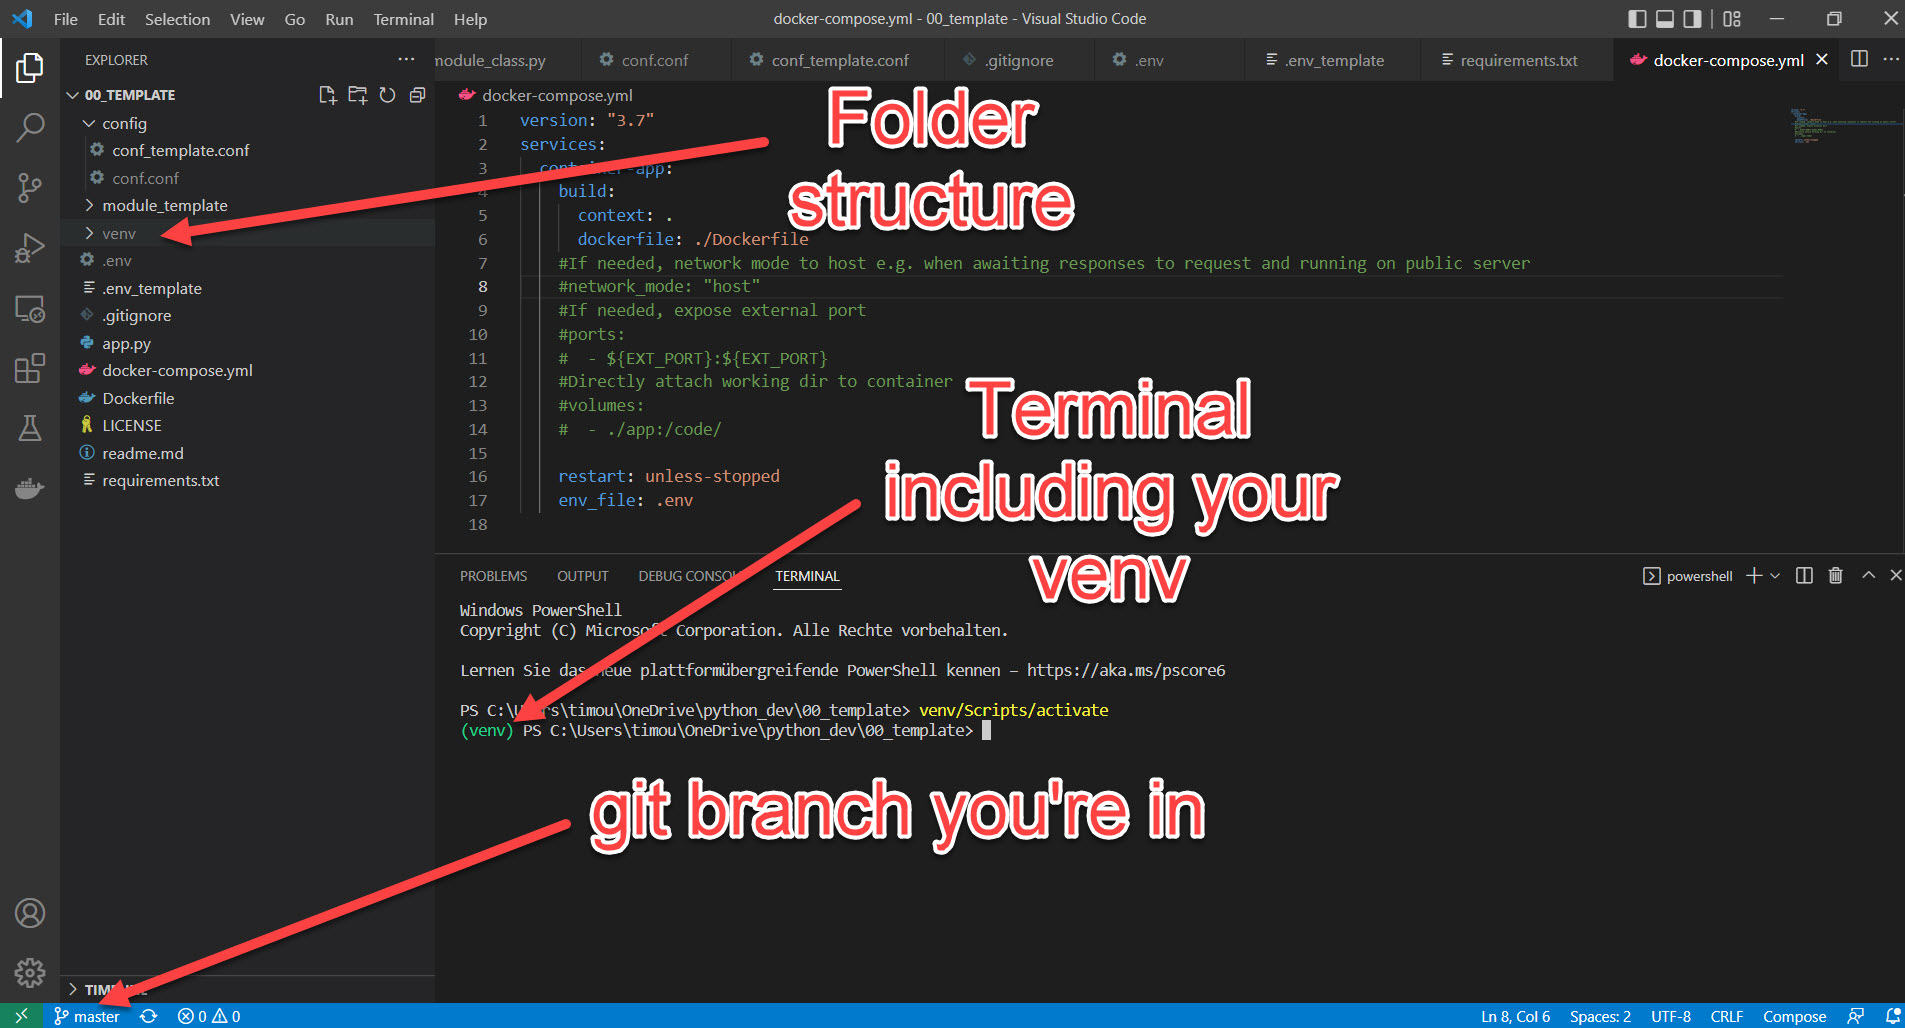
Boom, that created a .git folder in your folder which is your repositoriy (repo) and will from now on track all the weird changed you commit (ah by the way, DO NOT HARDCODE ANY PASSWORDS into your code and commit them – just a friendly hint 🙂 ).
Because we’re also holding a venv folder, we should also create a .gitignore file which tells git to ignore certain folders. The file content can look as simple as this:
The venv folder could contain thousands of single files depending on the packages you install. So you do not want to have them in your private repo.
					git status
git add .
git commit -m "this is my first commit"
git remote add origin ssh://your-git-repo-address
If you’re registered on GitHub now, you can also add your remote repository. First, I’d recommend you to setup an SSH-Key pair with your private computer and your GitHub account. Here are the docs on how to do that:
https://docs.github.com/en/authentication/connecting-to-github-with-ssh
This will dramatically ease your life and make your connection even safer. Set up single SSH-Key pairs for every machine you plan to work from.
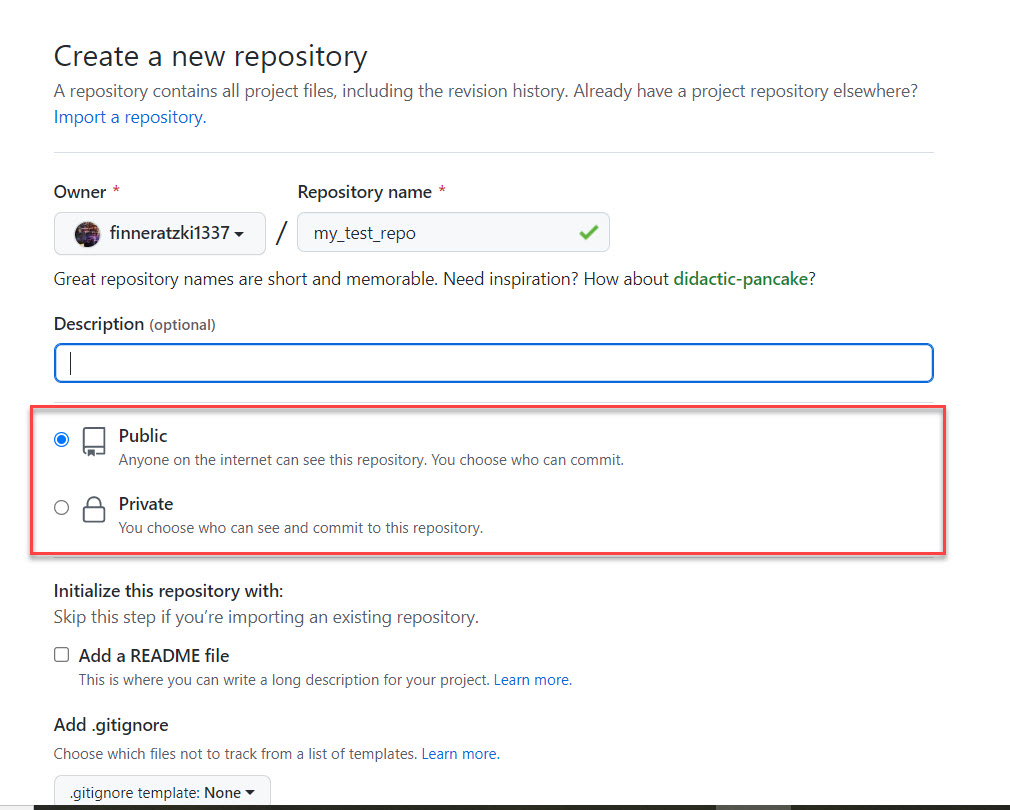
If ready, go to GitHub, create you first online repo and copy paste the SSH address from your new repos page. Pay attention to the Public/Private setting. Also you don’t need GitHub to add any files.
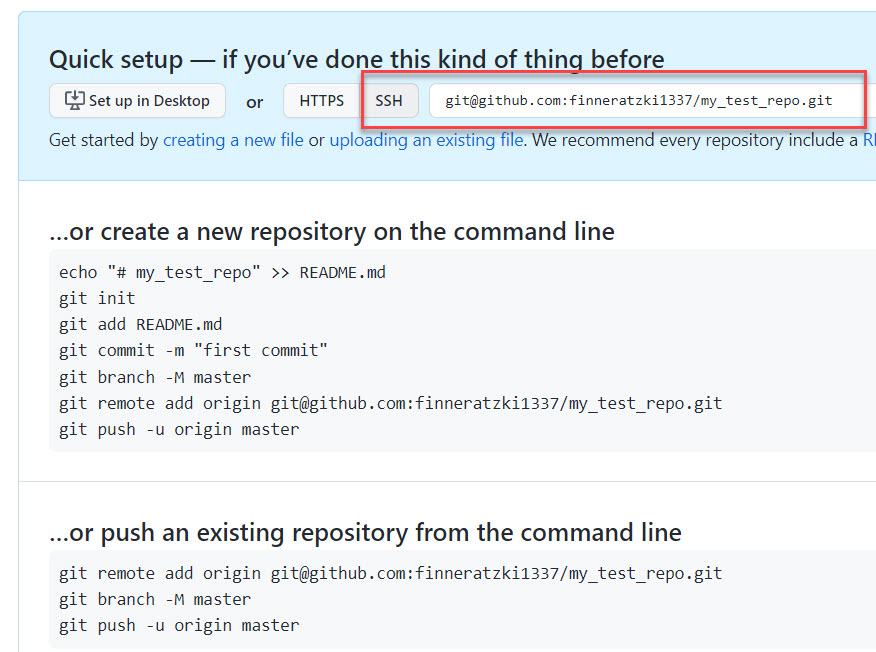
Then go to your local repo and add the remote one as “origin”. Pushing you repo into “origin” will sync your local developments with the cloud repo at GitHub.
					git remote add origin ssh://your-git-repo-address
git push origin master
Et voilá, now you have a local and online repo that you can sync as you like. If you plan to further develop your repo you would normally start with cloning your online repo into a new folder on your computer, setup the venv with your requirements.txt, improve the code and then git push origin master your changes back to GitHub.
From here you're good to go. Read further if your want to get into remote development and more advanced stuff.
Docker and Docker-Compose
Docker enables you to run your code in pretty little controlled containers. This kind of container would run on a Windows machine and on Linux, enabling you to program your code locally and later deploy it on any kind of cloud server (read my article on FastAPI cloud app architecture for non-pro’s).
You can easily run a MySQL and a WordPress container, simulating a fully working WordPress environment. Check out my docker-compose.yml for a ready to use local WordPress development setup.
You can reach your test WordPress Site on http://localhost:1234 in your browser and PhpMyAdmin on http://localhost:8081
					version: '3'

services:
  wp_database:
    image: mysql:8.0.29
    container_name: wp_database
    volumes:
      - ./database/data:/var/lib/mysql
      - ./database/initdb.d:/docker-entrypoint-initdb.d
    restart: unless-stopped
    environment:
      MYSQL_ROOT_PASSWORD: kjsdhfkjhdsfglkjhl87687kjahsd # any random string will do
      MYSQL_DATABASE: my_db_name # the name of your mysql database
      MYSQL_USER: my_db_user # the name of the database user
      MYSQL_PASSWORD: my_db_password # the password of the mysql user

  phpmyadmin:
    image: phpmyadmin
    container_name: phpmyadmin
    ports:
      - "8081:80"
    links:
      - wp_database:mysql
    restart: unless-stopped
    environment:
      PMA_HOST: mysql
      UPLOAD_LIMIT: 500M

  wordpress:
    depends_on:
      - wp_database
    image: wordpress:php7.4 # we're using the image with php7.1
    container_name: wordpress
    ports:
      - "1234:80"
    restart: unless-stopped
    links:
      - wp_database:mysql
    volumes:
      - ./src:/var/www/html
Basically all you need to do is download and install Docker on your computer. If you’re running on Windows, the process is as easy as downloading the Docker desktop app and install it. For the others, here’s a link to the installation instructions: https://docs.docker.com/get-docker/
Here’s an article where I explain the concept of Docker containers more in detail [LINK]. For this tutorial I just want you to know that I’ve made best experience with using the full stack, meaning Docker and Docker-Compose always at once.
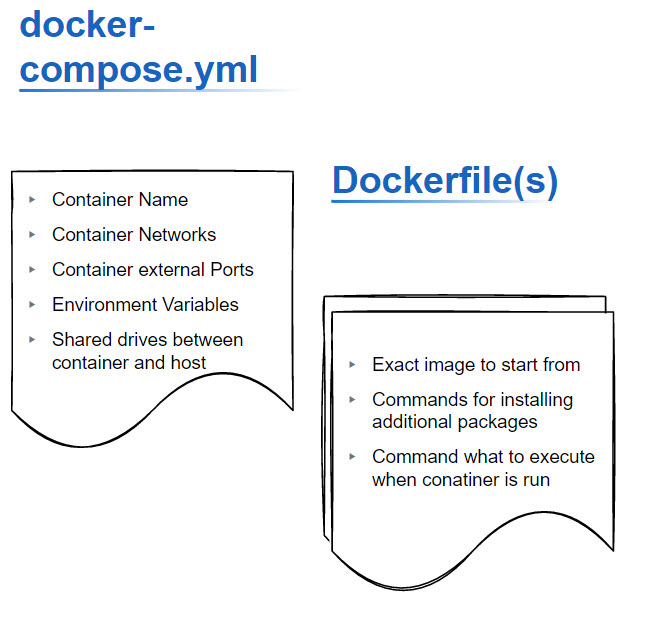
The docker-compose.yml file tells Docker everything abouth the environment and “external” behavior of a container, the Dockerfile itself (which is run when the container is built) tells Docker everything about how the container is made up exactly and what code it’s supposed to execute.
Check out the docker-compose.yml and Dockerfule in my template repo (and by the way, use my templates anyway): https://github.com/finneratzki1337/python-docker-template
Your own domain (yup thats right you should have one)
Once you’ve decided to run your own vServer, it would be nice to reach it easy and make your apps accessible, right?
I bet you can find a domain for a cheap as $1 per year. Buy it, and have the A-Record of the DNS entries of this domain point to your vServer. In a later tutorial [LINK] I will write more in detail how you can connect certain subdomains using a reverse proxy to single Docker Containers that run an API you’ve programmed.
That way you can actually pretty easily connect any service to e.g. api.your-funny-domain.com and have it receiving your new database entries or reply to your requests.